> ## Documentation Index
> Fetch the complete documentation index at: https://docs.connect-crm.com/llms.txt
> Use this file to discover all available pages before exploring further.
# Zapier
> Get started with the Zapier integration in Connect-CRM.
### Prerequisites
* An active Zapier account.
* An active API key from Connect-CRM. You can find out how to create an API key in the [Rest API documentation](/developers/authentication).
### Steps to Connect-CRM with Zapier
1. Sign in to your Zapier account at [zapier.com](https://zapier.com).
2. In Zapier, click on **Create > Zap** to start creating a new workflow.
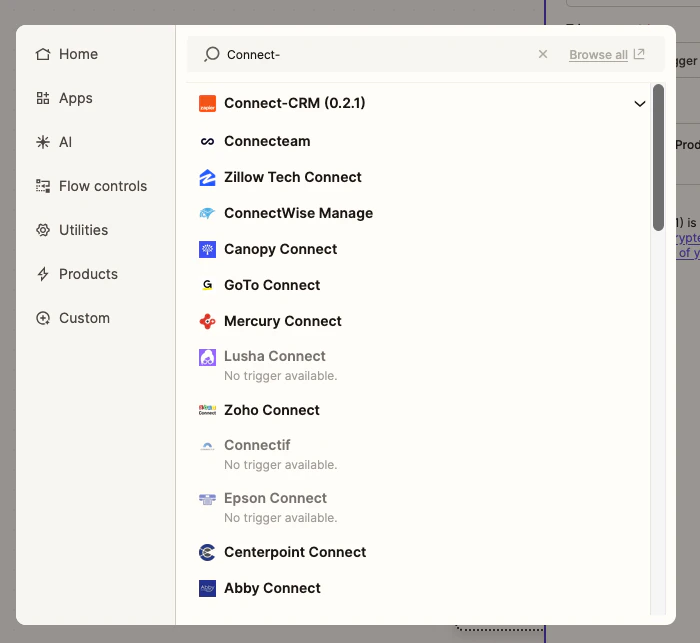
3. Choose Connect-CRM as the app to connect. You can search for it in the search bar.
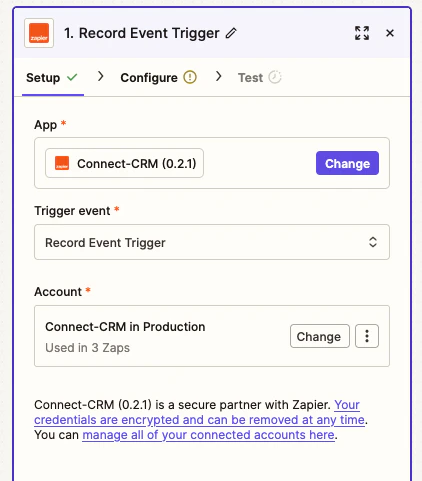
 1. Select the desired trigger event from Connect-CRM (e.g., "Record Event Trigger") and click **Continue**.
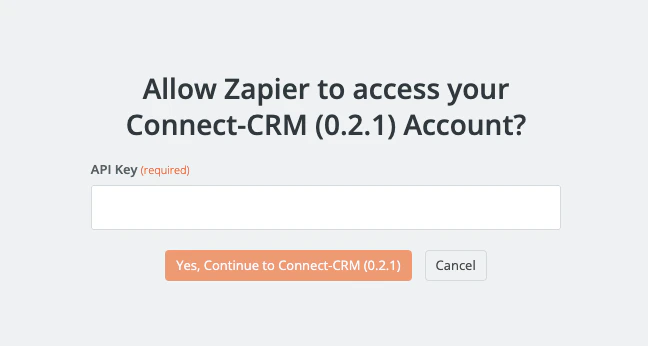
 1. To use your connect-CRM account, you will need to give Zapier access using your API key. Click on **Connect a new account** and enter your Connect-CRM API key when prompted and click **Yes, Continue**.
 1. Click **Continue**.
2. On the next screen, set up the trigger by selecting the desired options (e.g., Record Name, Operation) and click **Continue**.
3. Test the trigger to ensure it's working correctly by clicking on **Test trigger**.
4. If all goes well, you should see a success message. Click **Continue** to proceed.
### What the trigger delivers
Each event is delivered as a JSON body containing the record's `id`, its object
`type`, the `event` name (`{object}.{operation}`, for example `deals.updated`),
your `workspaceId`, a `timestamp`, and the record's `attributes`.
**Updated events carry last-known state, not a diff.** The payload describes
what the record looks like at the moment we deliver the webhook — not the
specific change that fired it. It does not tell you which fields changed, and
it does not include their previous values.
One practical consequence: several updates to the same record in quick
succession deliver one webhook each, and every one of them carries the same
final state. If your Zap needs to react to a particular field changing, compare
against a value you have stored yourself rather than expecting the payload to
describe the change.
`deleted` events are the one exception to the shape above. The record no longer
exists by the time the webhook is sent, so its `attributes` are delivered as an
empty object `{}` — `id` and `type` are still present and are what you should
key your Zap on.
1. Click **Continue**.
2. On the next screen, set up the trigger by selecting the desired options (e.g., Record Name, Operation) and click **Continue**.
3. Test the trigger to ensure it's working correctly by clicking on **Test trigger**.
4. If all goes well, you should see a success message. Click **Continue** to proceed.
### What the trigger delivers
Each event is delivered as a JSON body containing the record's `id`, its object
`type`, the `event` name (`{object}.{operation}`, for example `deals.updated`),
your `workspaceId`, a `timestamp`, and the record's `attributes`.
**Updated events carry last-known state, not a diff.** The payload describes
what the record looks like at the moment we deliver the webhook — not the
specific change that fired it. It does not tell you which fields changed, and
it does not include their previous values.
One practical consequence: several updates to the same record in quick
succession deliver one webhook each, and every one of them carries the same
final state. If your Zap needs to react to a particular field changing, compare
against a value you have stored yourself rather than expecting the payload to
describe the change.
`deleted` events are the one exception to the shape above. The record no longer
exists by the time the webhook is sent, so its `attributes` are delivered as an
empty object `{}` — `id` and `type` are still present and are what you should
key your Zap on.